Computer Engineer Jeffrey Palermo created Onion Architecture for creating app which are highly maintainable and loosely coupled. This architecture somewhat resembles the layers which can be seen on cutting an onion vegetable. You can separate the layers of onion very easily and eat them in your salads. In the same way the layers of Onion Architecture are separatable as they are loosely coupled, and this gives a highly testable architecture.
In this tutorial I will be Implementing Onion Architecture in ASP.NET Core with CQRS. You can download the complete source code from my GitHub Repository.
Page Contents
In the Onion Architecture there are separatable concentric layers of codes such that the inner most layer is fully independent to other layers. Mostly you have 3 layers in this architecture and these are – Domain, Application and “Infrastructure + Presentation”. Domain is the innermost layer while Infrastructure + Presentation is outermost layer.
See the below image illustration of the Onion Architecture.
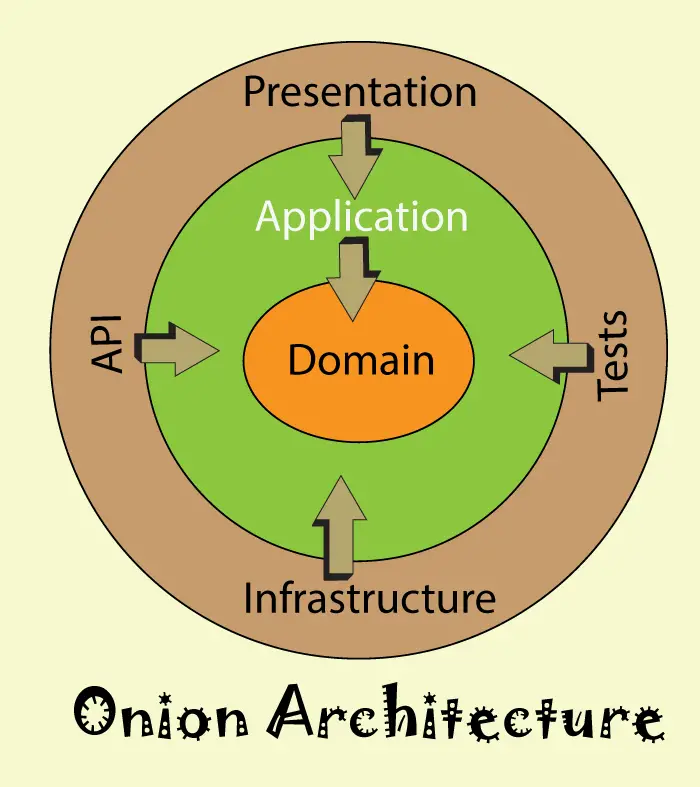
You must have question like – What are the main layers of Onion Architecture and how they communicate with one another. These questions answers will be answered in this section.
In your ASP.NET Core app, Onion Architecture can be created with 3 layers. These are:
At the center, there is Domain Layer which is not dependent on any other layer. The Domain layer contains Entities which are common throughout the application and hence can be shared across other solutions to. Suppose you are building an app for a School so you will probably add entities like Student, Teacher, Fees classes in the Domain layer. Got the point?
The Application Layer in Onion Architecture contains Interfaces and these interfaces will be implemented by the outer layers of Onion Architecture like the Infrastructure + Presentation Layers.
For the School app, we may add an interface dealing with database operations for the entities called Student, Teacher and fees. This interface can be implemented in the outer Infrastructure Layer where the actual database operations are added. This is also creating the Dependency Inversion Principle.
This also helps in building scalable application, how? Example – we can add new Interfaces for dealing with SMS/Email sending codes. Then we can implement these interfaces on the infrastructure layer. If in future the need for changes arise, we can easily change the implementations of the interfaces in the infrastructure Layer without affecting the Domain and Application layers.
What is Dependency Inversion Principle? Dependency Inversion Principle (DIP) states that the high-level modules should not depend on low-level modules. We create interfaces in the Application Layer and these interfaces get implemented in the external Infrastructure Layer.
The Infrastructure and Presentation Layers are outermost layers of Onion Architecture.
In the Infrastructure Layer we add infrastructure level codes like Entity Framework Core for DB operations, JWT Tokens for Authentication and other such works. All the heavy tasks of the app are performed in this layer.
The Presentation Layer will have a project which the user will use. This can be a project of Web API, Blazor, React or MVC type. Note that this project will also contain the User Interfaces.
As the Presentation layer is loosely coupled to other layers so we can easily change it. Like a React Presentation layer can be easily changed to Blazor WebAssembly one.
Is Onion Architecture different than Clean Architecture? Clean architecture is just a term which describes creating architecture where the stable layers are not dependent on less stable layers. We already know that domain layer is the stable layer and is not dependent to the outer layers.
This means Onion Architecture is a Clean Architecture. I have listed some major points which a clean architecture should have:
How Onion Architecture differs from N-Tier architecture? Onion Architecture is a clean architecture while N-Tier is not a clean architecture. N-Tier is neither a scalable architecture. If you see the below given diagram of N-Tier architecture, you will find there are 3 layers – Presentation, Business, and Data Access. User interacts with the app from the Presentation layer as it contains the UI. The Business layer contains the business logic while the Data Access layer interacts with the database.
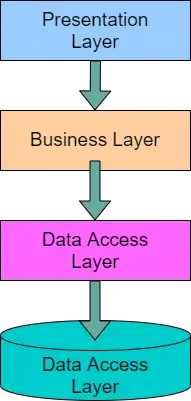
The data access layer usually contains ORM like Entity Framework core or Dapper. When creating n-tier architecture the layers depend on each other, and we end up building a highly coupled structure. This defeats the purpose of a Clean Architecture.
Start by creating a Blank Solution in Visual Studio.
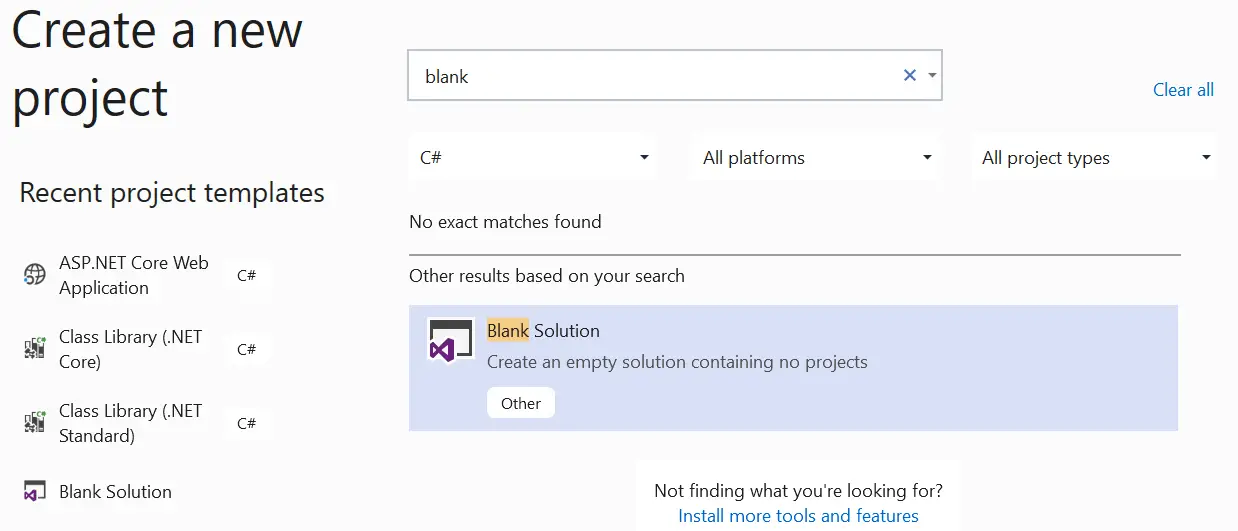
Name it as OnionApp or something else.
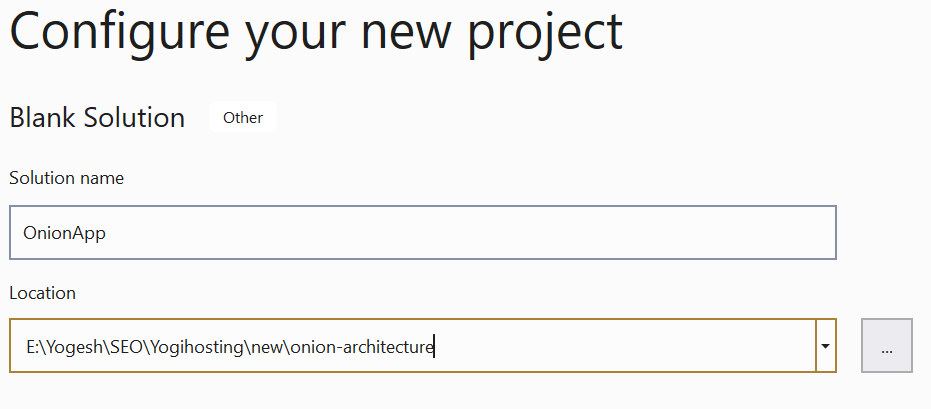
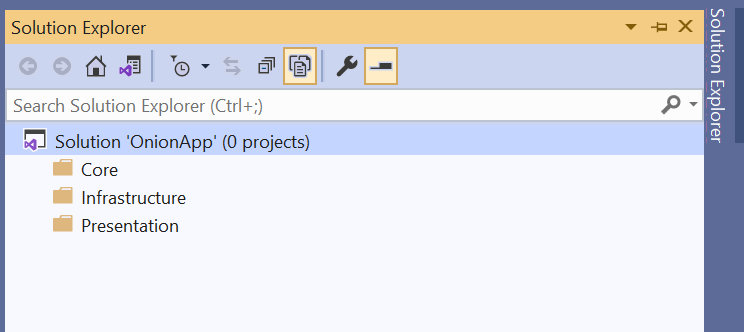
In the blank solution add 3 folder which will serves as the layers for the Onion Architecture.
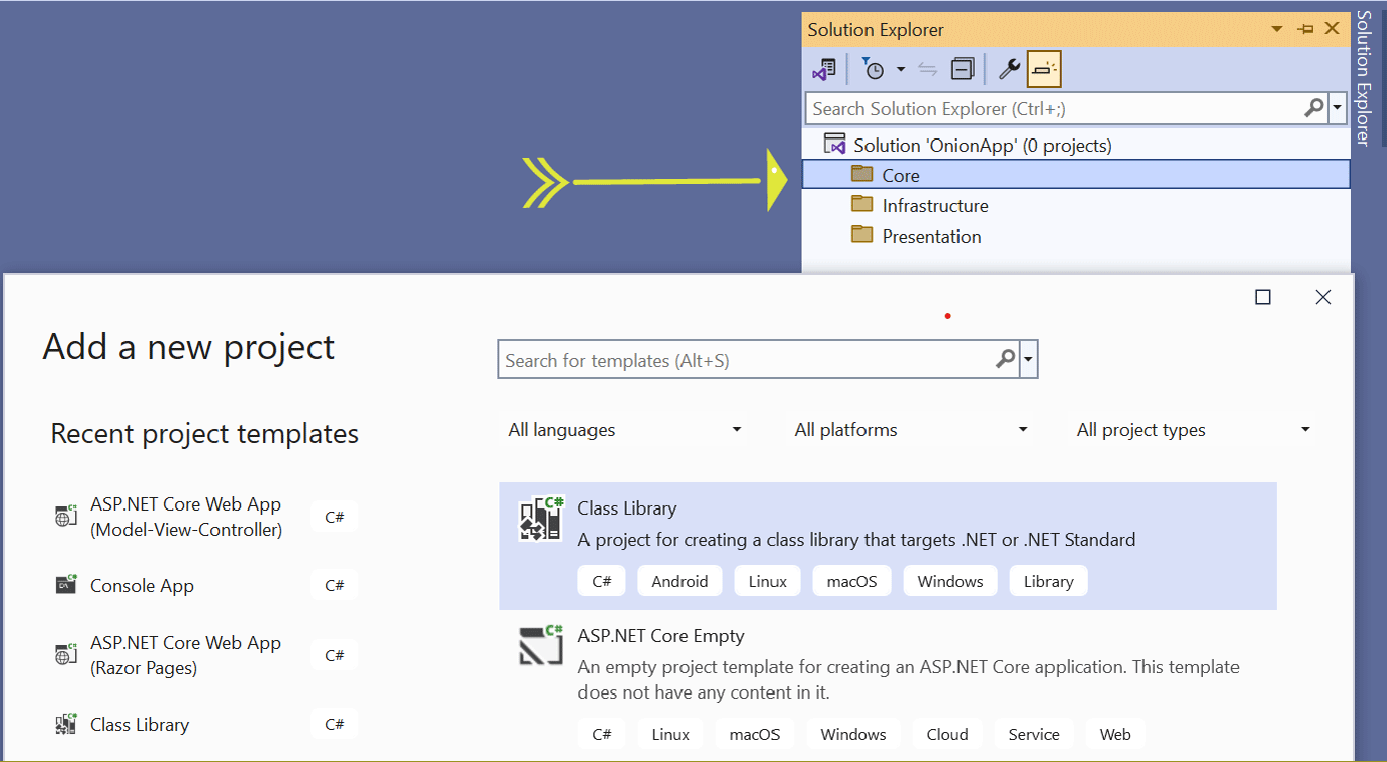
Right click on the Core folder and select Add ➤ New Project and select Class Library project.
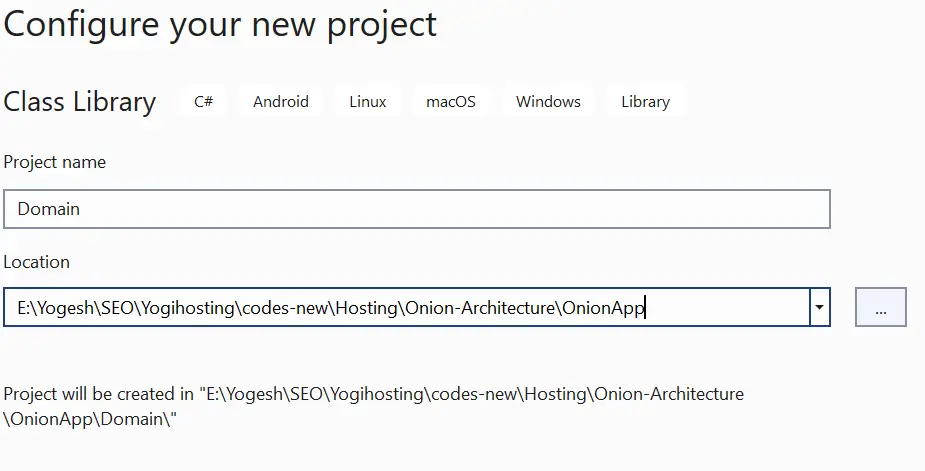
Name the project as Domain.
Also select the framework as .NET Standard 2.1.

Note: We can have any type of library project on the Domain layer as this layer is independent of other layers. This is the reason I chose .NET Standard, you can choose .NET Core if you wish to have it.
Now add a class called Student.cs to the Domain project. You can do this by right clicking on the project name in solution explorer and select Add ➤ New Item. On the item’s list, choose “Class” and Name it Student.cs.
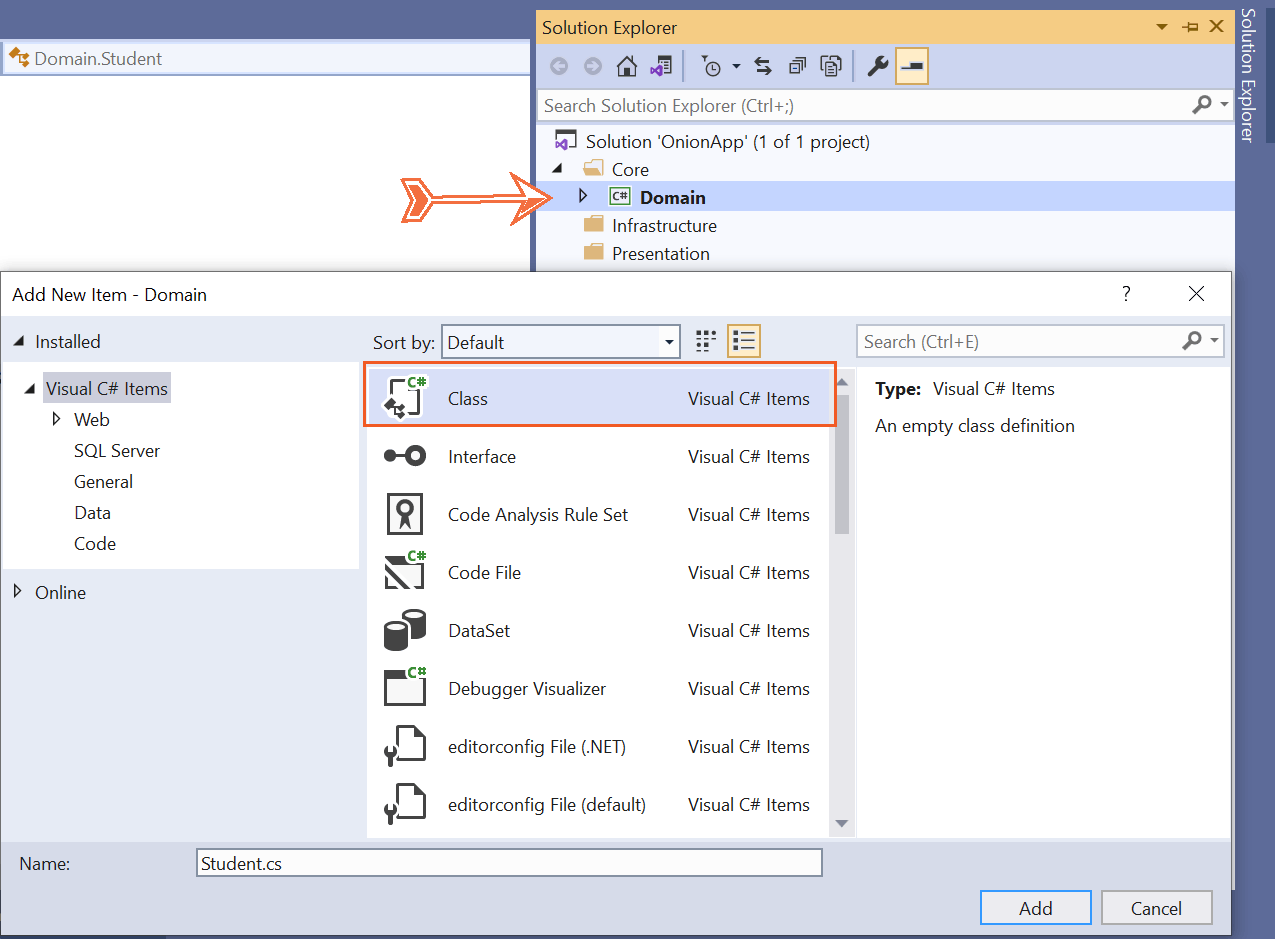
The Student.cs class is shown below. It is a fairly simple class containing just 3 properties to describe a student.
namespace Domain
{
    public class Student
    {
        public int Id { get; set; }
        public string Name { get; set; }
        public string Standard { get; set; }
        public int Rank { get; set; }
    }
}
We will be creating another Class Library Project inside the same “Core” folder. This project will be for the Application Layer. So, right click on the Core folder and select Add ➤ New Project, and select “Class Library” project. Name this project as Application, for this project select framework as .NET 8.0.

As states earlier, the Application Layer contain Interfaces which are implemented on the infrastructure layer. We will be adding 2 things in the Application project:
We earlier created an entity called Student in the domain layer, this entity should be mapped as a class for Entity Framework Core. This we all know is done by Data Context class. But here we won’t be doing this, instead we will add an Interface that will contain Entity Framework Core logic. This interface will be implemented on the Infrastructure layer and so EF codes does not fall under the Application Layer, but goes to the Infrastructure layer which is outside the “Core”.
In future if we decide to have a different implementation of this interface then we just have to change the implementation part which lies on the infrastructure layer. We don’t need to touch the application layer at all. This way we can build scalable applications.
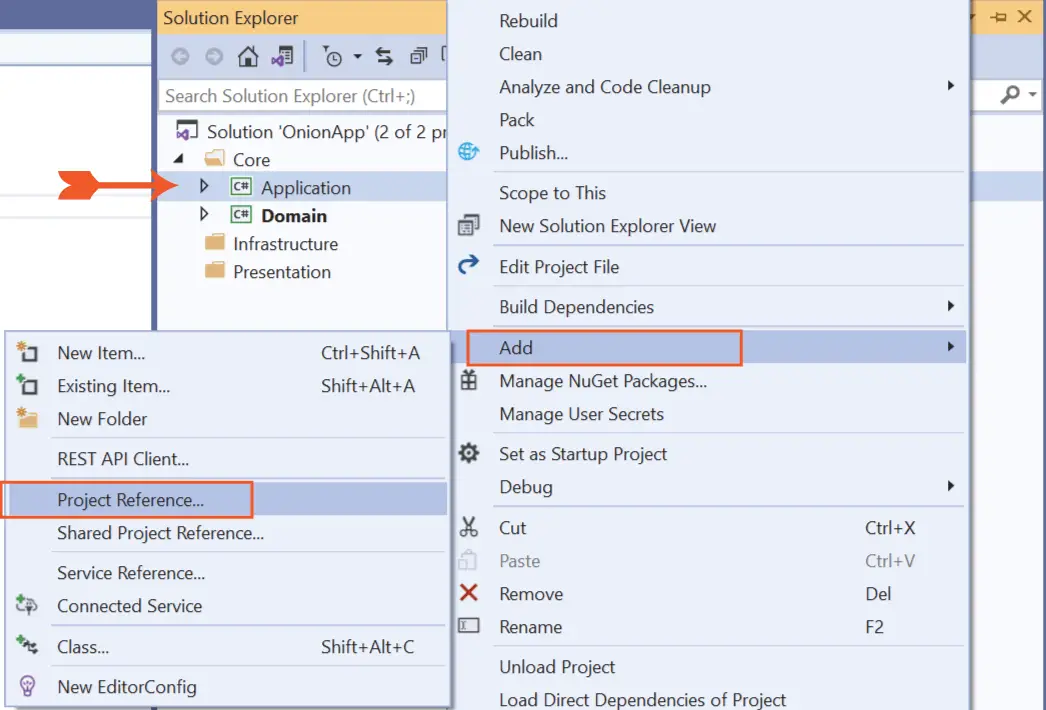
First add reference of the Domain Project in this project. Right click on Application project and select Add ➤ Project Reference.
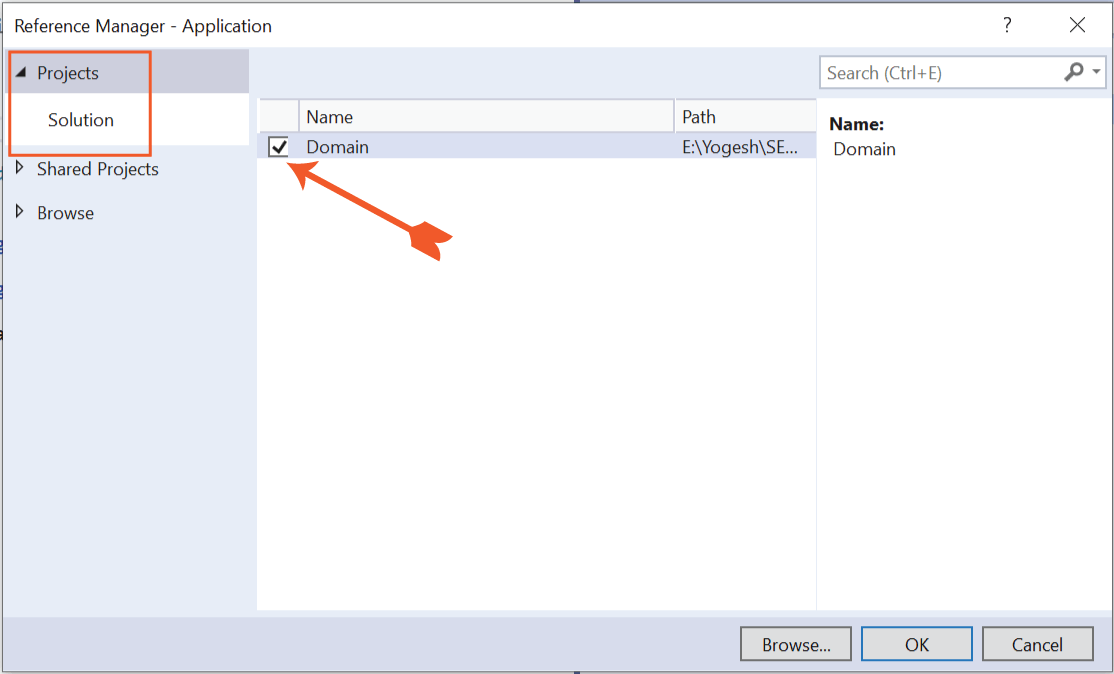
A new window will open. On it’s left side you will see Projects option, select it, then on the middle section you will see the Domin project. Select the checkbox for the domain project and click the OK button. This will add the Domain project’s reference to the Application project.
Next, from NuGet Package Manger, install the Microsoft.EntityFrameworkCore package to the Application project.
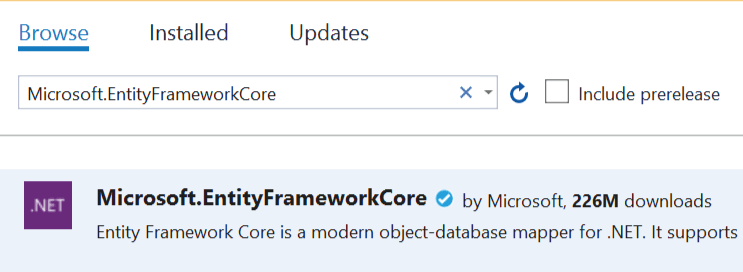
You can also add the Entity Framework Core package by running the command Install-Package Microsoft.EntityFrameworkCore on the Package Manager Console window of Visual Studio. Remember to select the Application project from the “Default project” dropdown. Check the below image.

Now add a new interface on the Application project and call it IAppDbContext.
using Domain;
using Microsoft.EntityFrameworkCore;

namespace Application
{
    public interface IAppDbContext
    {
        DbSet<Student> Students { get; set; }
        Task<int> SaveChangesAsync();
    }
}
Now we will add Command Query Responsibility Segregation (CQRS) pattern. This pattern specifies that different data models should be used to for updating / reading the database. I have written a descriptive CQRS article – Implementing ASP.NET Core CRUD Operation with CQRS and MediatR Patterns, you will find this article very helpful.
Start by adding the MediatR NuGet package to the Application project.

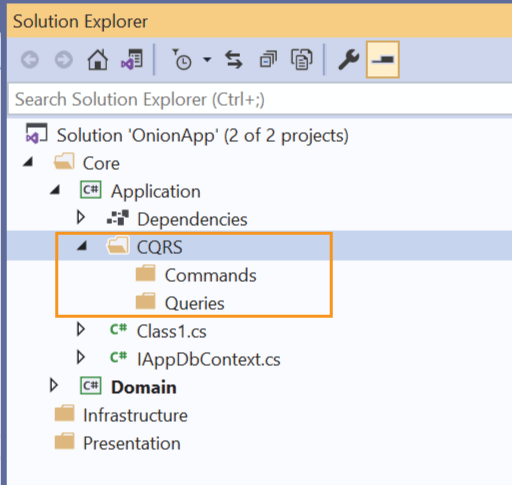
Then create a new folder and name it CQRS, inside this folder create 2 new folder that will hold Queries and Commands classes. Name these folder as “Queries” and “Commands”. Check the below image.
Next, inside the Commands folder add CQRS classes for commands, these are:
using Domain;
using MediatR;

namespace Application.CQRS.Commands
{
    public class CreateStudentCommand : IRequest<int>
    {
        public string Name { get; set; }
        public string Standard { get; set; }
        public int Rank { get; set; }
        public class CreateStudentCommandHandler : IRequestHandler<CreateStudentCommand, int>
        {
            private readonly IAppDbContext context;
            public CreateStudentCommandHandler(IAppDbContext context)
            {
                this.context = context;
            }
            public async Task<int> Handle(CreateStudentCommand command, CancellationToken cancellationToken)
            {
                var student = new Student();
                student.Name = command.Name;
                student.Standard = command.Standard;
                student.Rank = command.Rank;

                context.Students.Add(student);
                await context.SaveChangesAsync();
                return student.Id;
            }
        }
    }
}
using MediatR;

namespace Application.CQRS.Commands
{
    public class UpdateStudentCommand : IRequest<int>
    {
        public int Id { get; set; }
        public string Name { get; set; }
        public string Standard { get; set; }
        public int Rank { get; set; }
        public class UpdateStudentCommandHandler : IRequestHandler<UpdateStudentCommand, int>
        {
            private readonly IAppDbContext context;
            public UpdateStudentCommandHandler(IAppDbContext context)
            {
                this.context = context;
            }
            public async Task<int> Handle(UpdateStudentCommand command, CancellationToken cancellationToken)
            {
                var student = context.Students.Where(a => a.Id == command.Id).FirstOrDefault();

                if (student == null)
                    return default;

                student.Name = command.Name;
                student.Standard = command.Standard;
                student.Rank = command.Rank;
                await context.SaveChangesAsync();
                return student.Id;
            }
        }
    }
}
using MediatR;
using Microsoft.EntityFrameworkCore;

namespace Application.CQRS.Commands
{
    public class DeleteStudentByIdCommand : IRequest<int>
    {
        public int Id { get; set; }
        public class DeleteStudentByIdCommandHandler : IRequestHandler<DeleteStudentByIdCommand, int>
        {
            private readonly IAppDbContext context;
            public DeleteStudentByIdCommandHandler(IAppDbContext context)
            {
                this.context = context;
            }
            public async Task<int> Handle(DeleteStudentByIdCommand command, CancellationToken cancellationToken)
            {
                var student = await context.Students.Where(a => a.Id == command.Id).FirstOrDefaultAsync();
                if (student == null) return default;
                context.Students.Remove(student);
                await context.SaveChangesAsync();
                return student.Id;
            }
        }
    }
}
Now, inside the Queries folder add CQRS classes for queries, these are:
using Domain;
using MediatR;
using Microsoft.EntityFrameworkCore;

namespace Application.CQRS.Queries
{
    public class GetAllStudentQuery : IRequest<IEnumerable<Student>>
    {

        public class GetAllStudentQueryHandler : IRequestHandler<GetAllStudentQuery, IEnumerable<Student>>
        {
            private readonly IAppDbContext context;
            public GetAllStudentQueryHandler(IAppDbContext context)
            {
                this.context = context;
            }
            public async Task<IEnumerable<Student>> Handle(GetAllStudentQuery query, CancellationToken cancellationToken)
            {
                var studentList = await context.Students.ToListAsync();
                if (studentList == null)
                {
                    return null;
                }
                return studentList.AsReadOnly();
            }
        }
    }
}
using Domain;
using MediatR;
using Microsoft.EntityFrameworkCore;

namespace Application.CQRS.Queries
{
    public class GetStudentByIdQuery : IRequest<Student>
    {
        public int Id { get; set; }
        public class GetStudentByIdQueryHandler : IRequestHandler<GetStudentByIdQuery, Student>
        {
            private readonly IAppDbContext context;
            public GetStudentByIdQueryHandler(IAppDbContext context)
            {
                this.context = context;
            }
            public async Task<Student> Handle(GetStudentByIdQuery query, CancellationToken cancellationToken)
            {
                var student = await context.Students.Where(a => a.Id == query.Id).FirstOrDefaultAsync();
                if (student == null) return null;
                return student;
            }
        }
    }
}
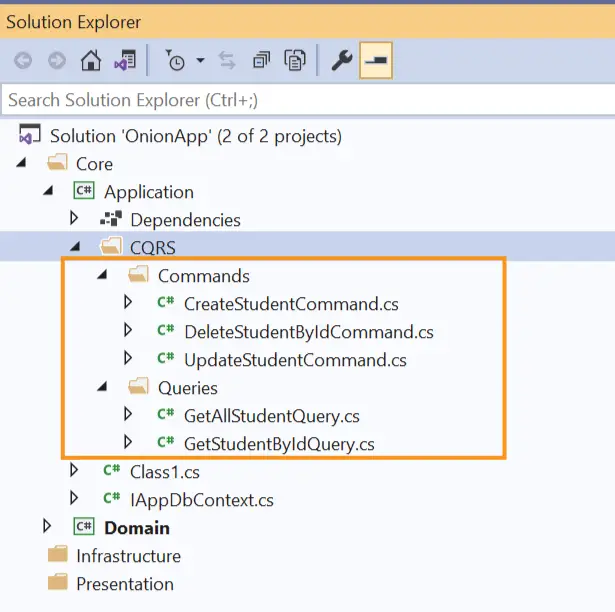
These classes will implement the CQRS pattern and will perform database CRUD operations for the Student entity. As you may have already noticed, they are using Entity Framework Core for performing database operations. You can see these classes in the below image.
We now will create an extension method to register MediatR library which can be done by adding a class called DependencyInjection.cs. The code of this class is given below:
using Microsoft.Extensions.DependencyInjection;
using System.Reflection;

namespace Application
{
    public static class DependencyInjection
    {
        public static void AddApplication(this IServiceCollection services)
        {
            services.AddMediatR(a => a.RegisterServicesFromAssembly(Assembly.GetExecutingAssembly()));
        }
    }
}
We will be calling the method AddApplication from the Program class when we will create the Presentation layer.
We now will move to Infrastructure layer.
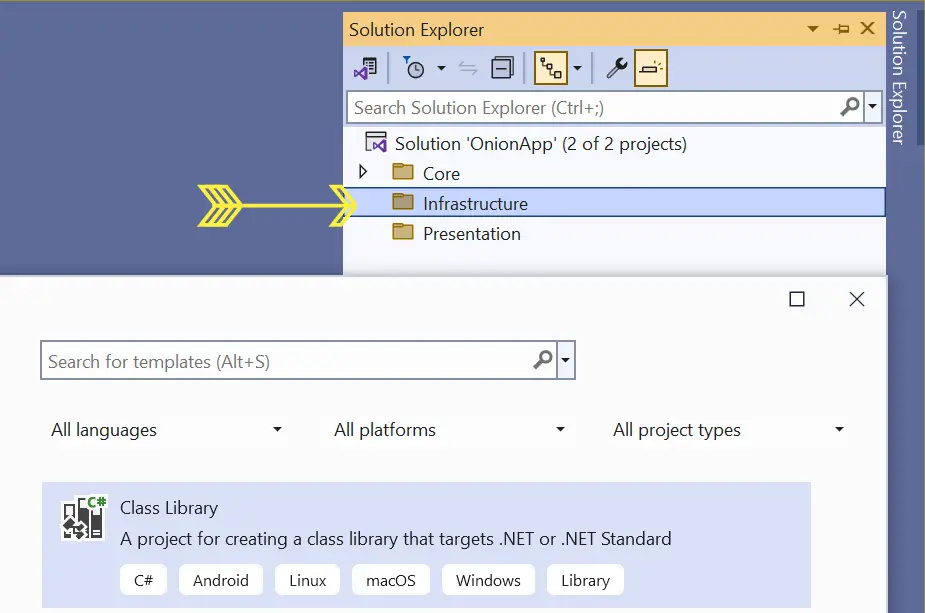
Now create a Class Library project inside the Infrastructure folder. Name this project as “Persistence”.
Next, perform a couple of things which are:
Install-Package Microsoft.EntityFrameworkCore
Install-Package Microsoft.EntityFrameworkCore.SqlServer
Install-Package Microsoft.EntityFrameworkCore.Design
In this project we will setup Entity Framework Core which will access the CRUD operations performed by CQRS. Recall, we already created CRUD operations on the Application project.
Note that we will be using this layer to perform Migrations and Generate our database. We will see this in just a moment.
Remember we created an IAppDBContext Interface in the Application Layer? Now it’s time to implement it. So add a new class called AppDbContext.cs to the Persistence project and implement “IAppDBContext” interface as shown below.
using Application;
using Domain;
using Microsoft.EntityFrameworkCore;

namespace Persistence
{
    public class AppDbContext : DbContext, IAppDbContext
    {
        public AppDbContext(DbContextOptions<AppDbContext> options)
            : base(options)
        {
        }

        public DbSet<Student> Students { get; set; }

        public async Task<int> SaveChangesAsync()
        {
            return await base.SaveChangesAsync();
        }
    }
}
With our infrastructure layer complete, we are ready to generate the database. But there is a catch, EF Core migrations can only be run from a project which has Program.cs class therefore we can only run the migrations from the Web API project of the Presentation layer.
Now coming to a very important part which is how the dependency of IAppDbContext will be resolved and how EF Core will pic the database during migration? The best way is to create an extension method in our “Persistence” project and we will call this method from the Program class of our Web API project. So, create a new class called DependencyInjection.cs which contains this extension method. The code of this class is given below.
using Application;
using Microsoft.EntityFrameworkCore;
using Microsoft.Extensions.Configuration;
using Microsoft.Extensions.DependencyInjection;

namespace Persistence
{
    public static class DependencyInjection
    {
        public static void AddPersistence(this IServiceCollection services, IConfiguration configuration)
        {
            services.AddDbContext<AppDbContext>(options =>
                options.UseSqlServer(
                    configuration.GetConnectionString("DefaultConnection"),
                    b => b.MigrationsAssembly("WebApi")));
            services.AddScoped<IAppDbContext>(provider => provider.GetService<AppDbContext>());
        }
    }
}
Clearly see that we are telling EF Core to get the connection string from DefaultConnection node of appsettings.json file.
configuration.GetConnectionString("DefaultConnection")And the appsettings.json file should be searched in the assembly called “WebApi”. This also means our Web API project should be named as “WebApi”.
b => b.MigrationsAssembly("WebApi")Now let us move towards the final layer which is the Presentation layer.
Start by adding an ASP.NET Core Web API project in the Presentation folder.
.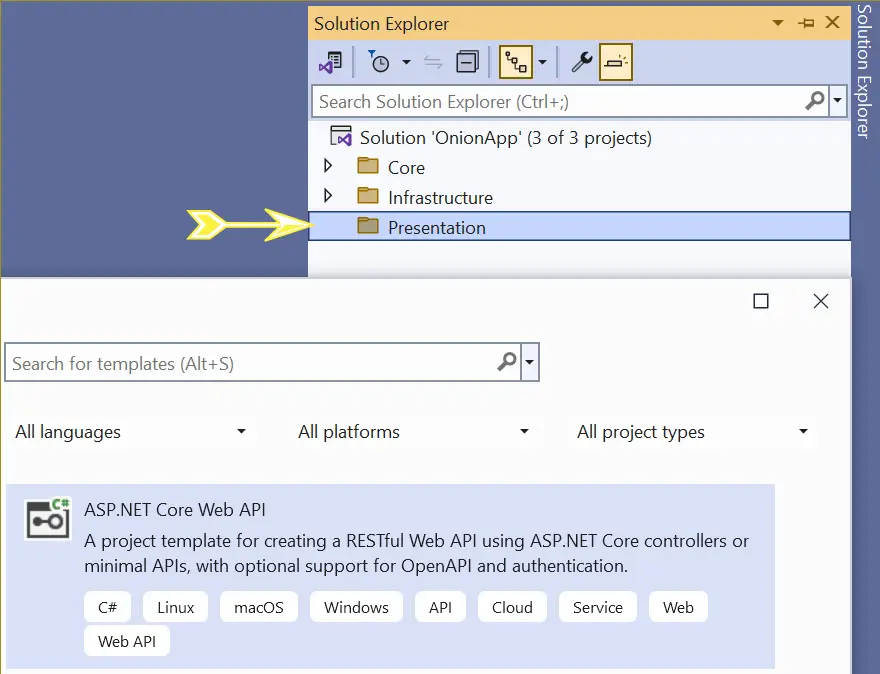
Name it WebApi (do you know why? See the extension method we created earlier). On the next screen, select .NET 8.0 for framework and check the checkbox option Enable OpenAPI support.
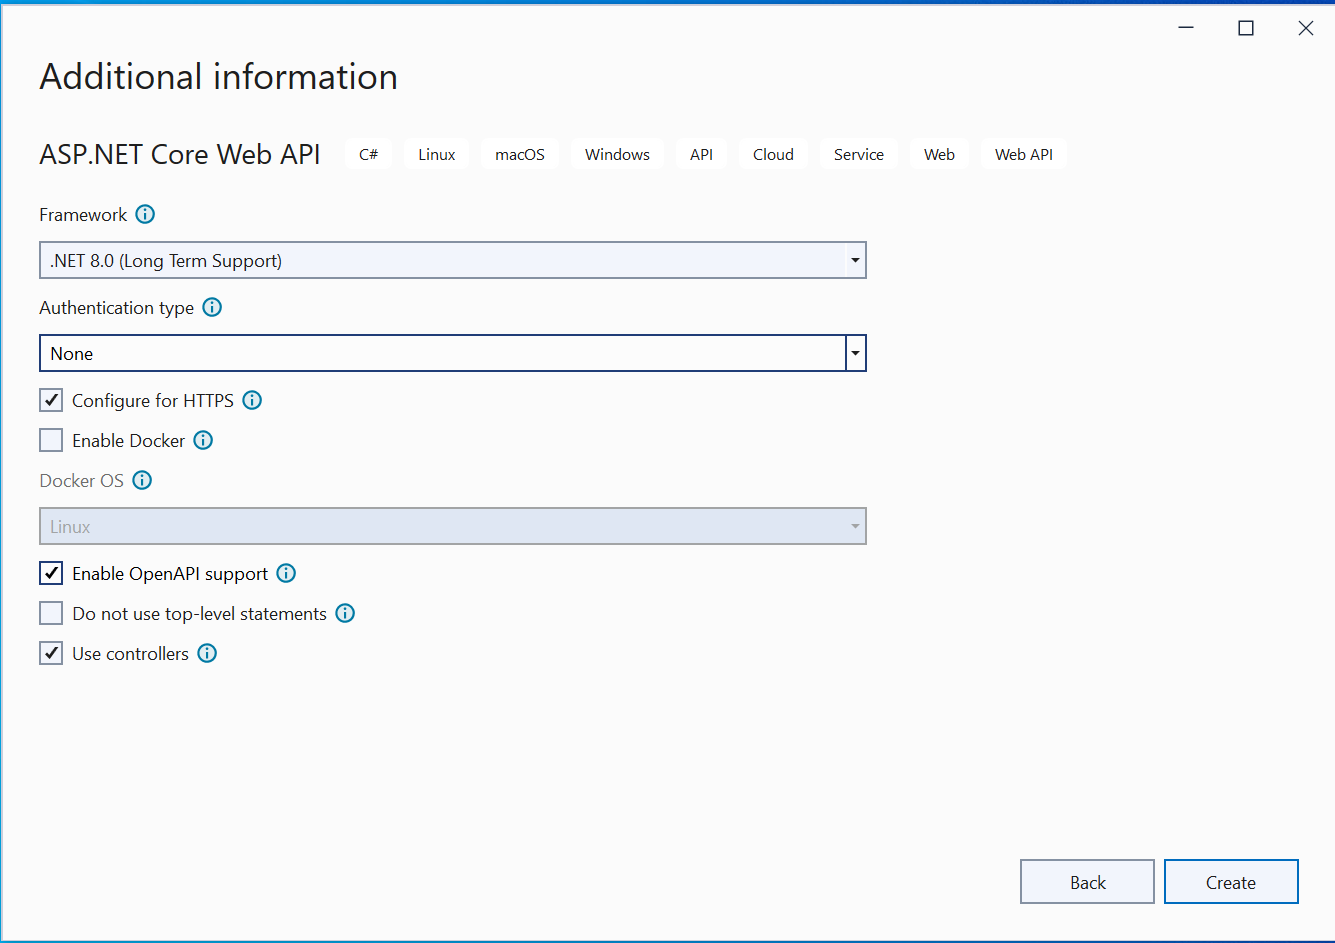
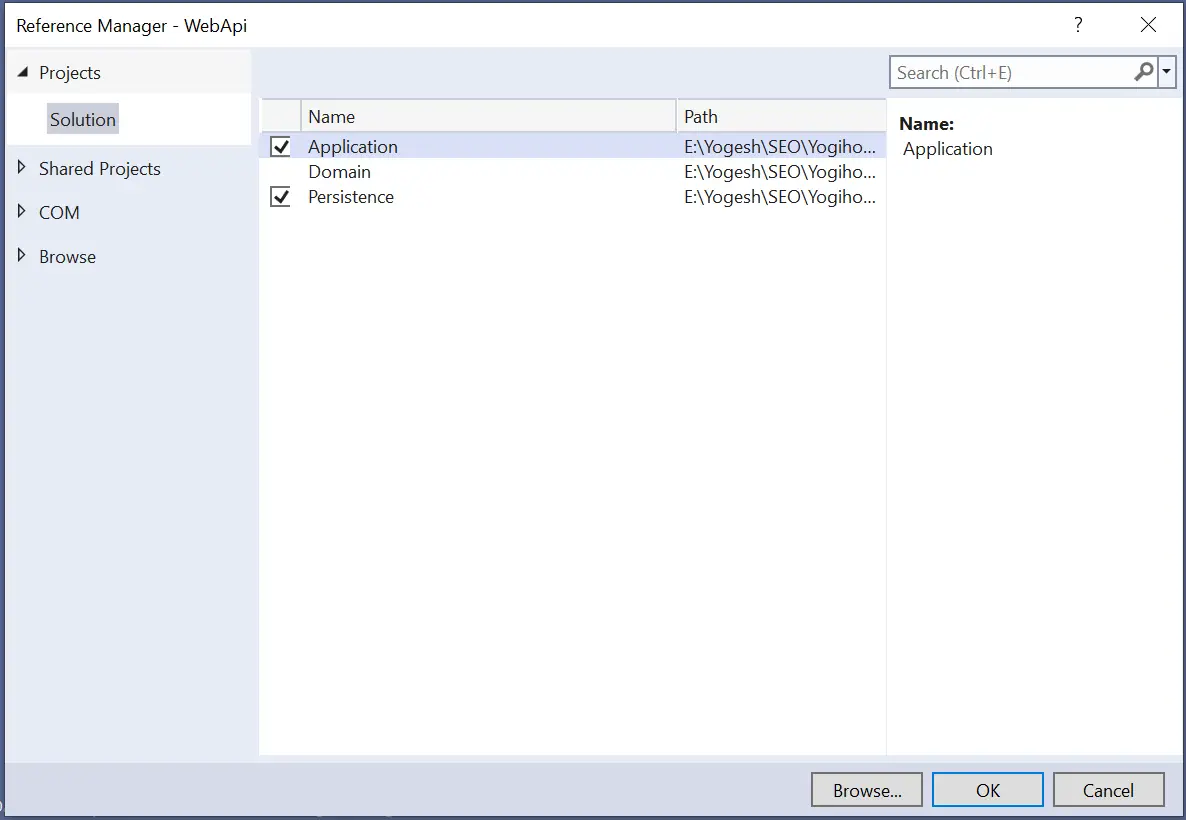
Since this project will be calling the component of the “Application and Persistence” projects so make sure you add the project references to these 2 projects in your WebApi project. You need to right click the Dependencies folder, then click the Add Project Reference option. In the dialog that opens, select Application and Persistence projects and click the OK button.
Now open the appsetting.json file and add the connection string for the database.
{
  "ConnectionStrings": {
    "DefaultConnection": "Server=(localdb)\\mssqllocaldb;Database=OnionAppDb;Trusted_Connection=True;MultipleActiveResultSets=true"
  }
}
Here, I have name my database as OnionAppDb.
Next open the Program.cs class and call the 2 extension methods which we created earlier.
These extension methods registers MediatR and adds dependency injection middleware. This is shown by the highlighted code below.
using Persistence;
using Application;

var builder = WebApplication.CreateBuilder(args);

// Add services to the container.
builder.Services.AddApplication();
builder.Services.AddPersistence(builder.Configuration);

builder.Services.AddControllers();

// Learn more about configuring Swagger/OpenAPI at https://aka.ms/aspnetcore/swashbuckle
builder.Services.AddEndpointsApiExplorer();
builder.Services.AddSwaggerGen();

var app = builder.Build();

// Configure the HTTP request pipeline.
if (app.Environment.IsDevelopment())
{
    app.UseSwagger();
    app.UseSwaggerUI();
}

app.UseHttpsRedirection();

app.UseAuthorization();

app.MapControllers();

app.Run();
Before performing migrations, select Build ➤ Build Solution in Visual Studio, this is necessary to create the project references properly. Now open Package Manager Console window and navigate to the WebApi folder. This is done because migration commands must be run from the folder containing the Program.cs class.
Use the “cd” command to navigate to this folder:
cd WebApiNow run the below 2 commands which install dotnet-ef commannd and install the package Microsoft.EntityFrameworkCore.Tools to the “WebApi” project.
dotnet tool install --global dotnet-ef
Install-Package Microsoft.EntityFrameworkCore.Tools
Finally run the 2 EF core migration commands one by one.
dotnet ef migrations add Migration1
dotnet ef database update
I have shown them in the below image.
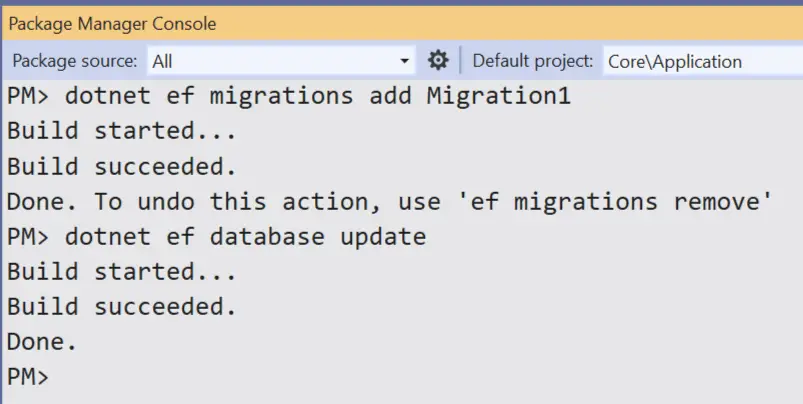
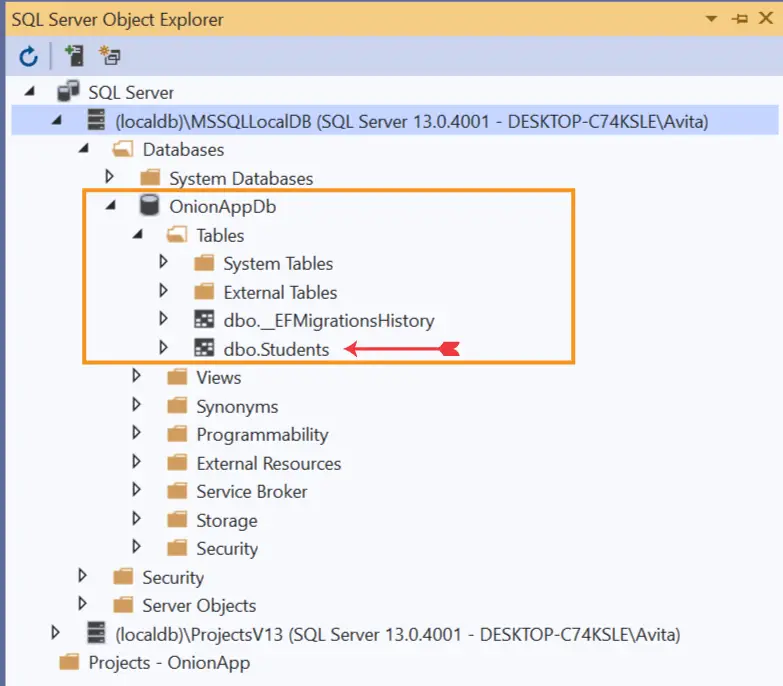
System.Globalization.CultureNotFoundException: Only the invariant culture is supported in globalization-invariant mode, then you have to turn the InvariantGlobalization property on WebApi project to false i.e. <InvariantGlobalization>false</InvariantGlobalization>.The commands will create a “Migrations” folder in the WebApi project and database in the MSSQLLocalDB. Navigate to View ➤ SQL Server Object Explorer in Visual Studio and you can see this newly created database with just one table called “Students”.
Next we will create Web Api controller for making HTTP Request to perform CRUD operations.
We now will create Web API Controller which will make HTTP requests to the CQRS classes we created in Application layer. So, add a new controller to the Controllers folder and name is HomeController.cs. Now add the following code to it.
using Application.CQRS.Commands;
using Application.CQRS.Queries;
using MediatR;
using Microsoft.AspNetCore.Mvc;

namespace WebApi.Controllers
{
    [ApiController]
    [Route("api/[controller]")]
    public class HomeController : ControllerBase
    {
        private IMediator mediator;
        public HomeController(IMediator mediator)
        {
            this.mediator = mediator;
        }

        [HttpPost]
        public async Task<IActionResult> Create(CreateStudentCommand command)
        {
            return Ok(await mediator.Send(command));
        }

        [HttpGet]
        public async Task<IActionResult> GetAll()
        {
            return Ok(await mediator.Send(new GetAllStudentQuery()));
        }

        [HttpGet("{id}")]
        public async Task<IActionResult> GetById(int id)
        {
            return Ok(await mediator.Send(new GetStudentByIdQuery { Id = id }));
        }

        [HttpDelete("{id}")]
        public async Task<IActionResult> Delete(int id)
        {
            return Ok(await mediator.Send(new DeleteStudentByIdCommand { Id = id }));
        }

        [HttpPut("[action]")]
        public async Task<IActionResult> Update(int id, UpdateStudentCommand command)
        {
            if (id != command.Id)
            {
                return BadRequest();
            }
            return Ok(await mediator.Send(command));
        }
    }
}
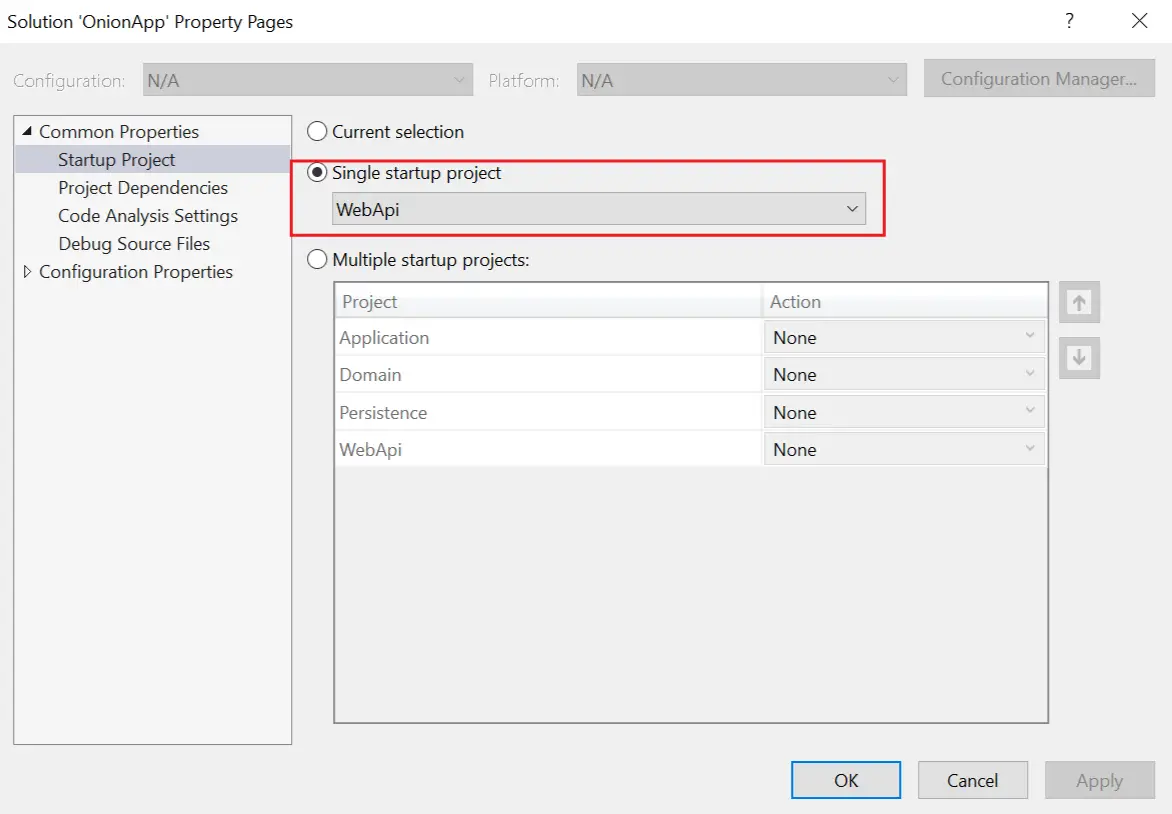
This controller has methods which wire up to the CQRS in the Application Layer. Through these methods we will be performing CRUD operations. So first you should make the WebApi project as the single startup project. To do this right click the Solution in the Solution Explorer and select properties. Then make WebAPI as single startup project.
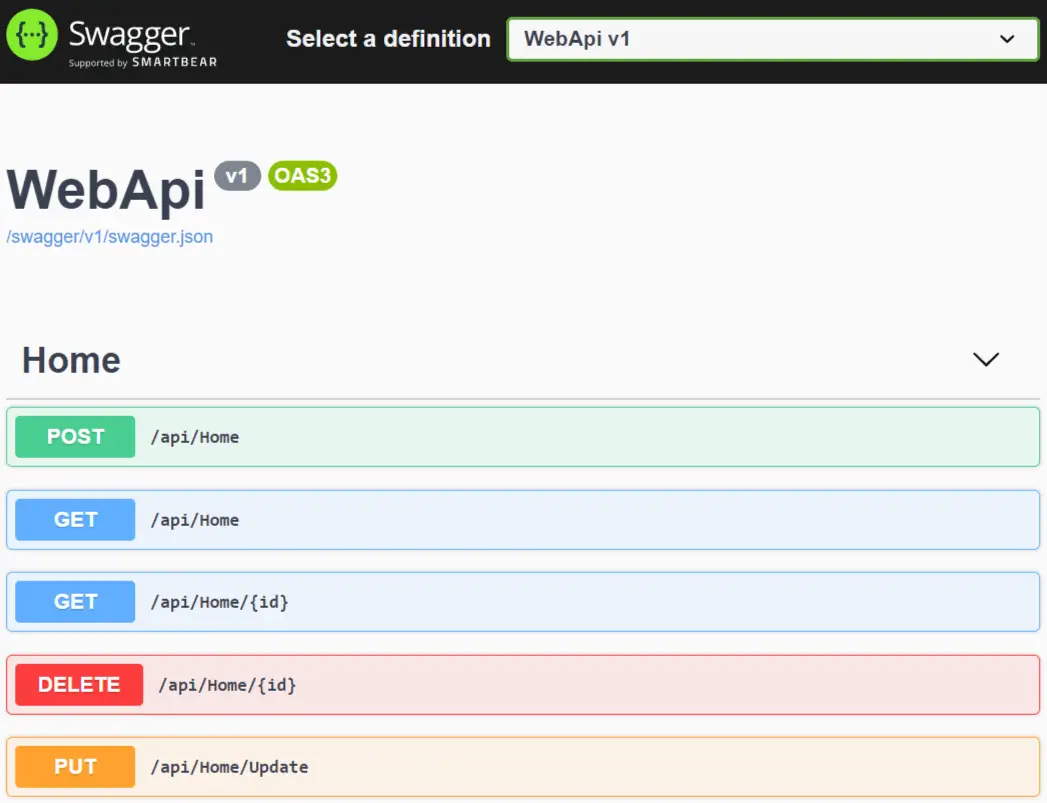
Swagger comes pre-configured in the Web API template. So run the app in Visual Studio and you will see the Swagger screen. It will show all the Web API methods we created.
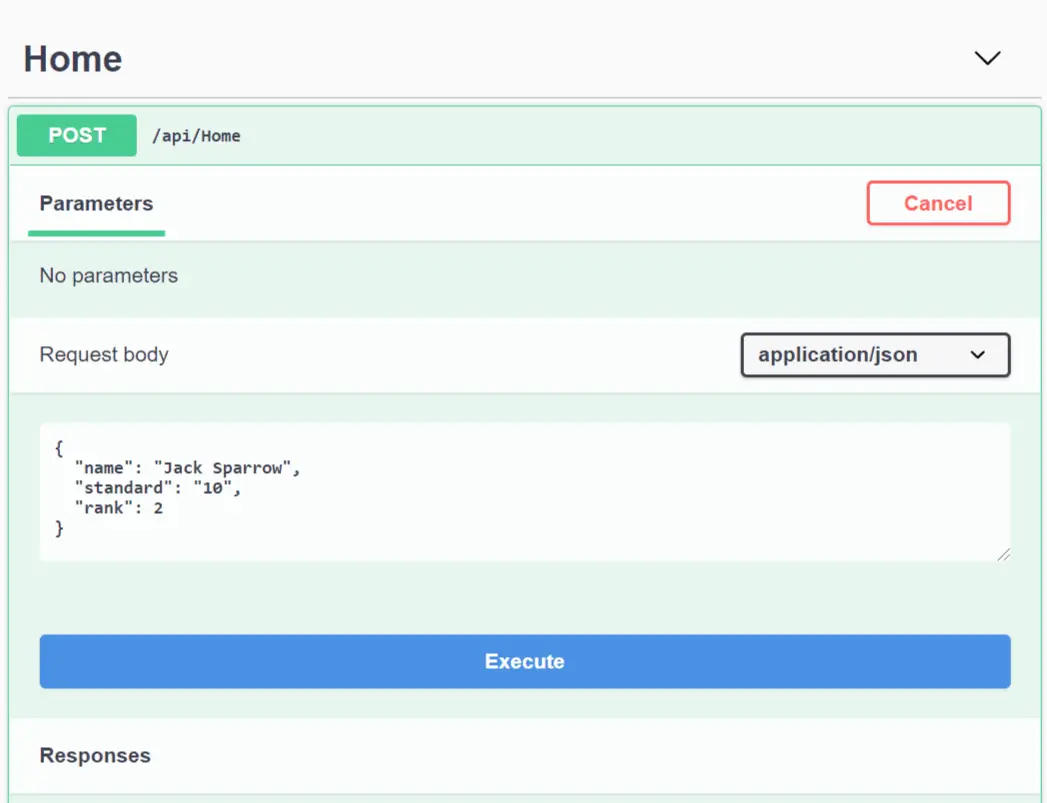
Click the POST button to test the creation of a new student.
In the Request Body add the name, standard and rank of the student as shown below and then clicking the execute button.
{
  "name": "Jack Sparrow",
  "standard": "10",
  "rank": 2
}
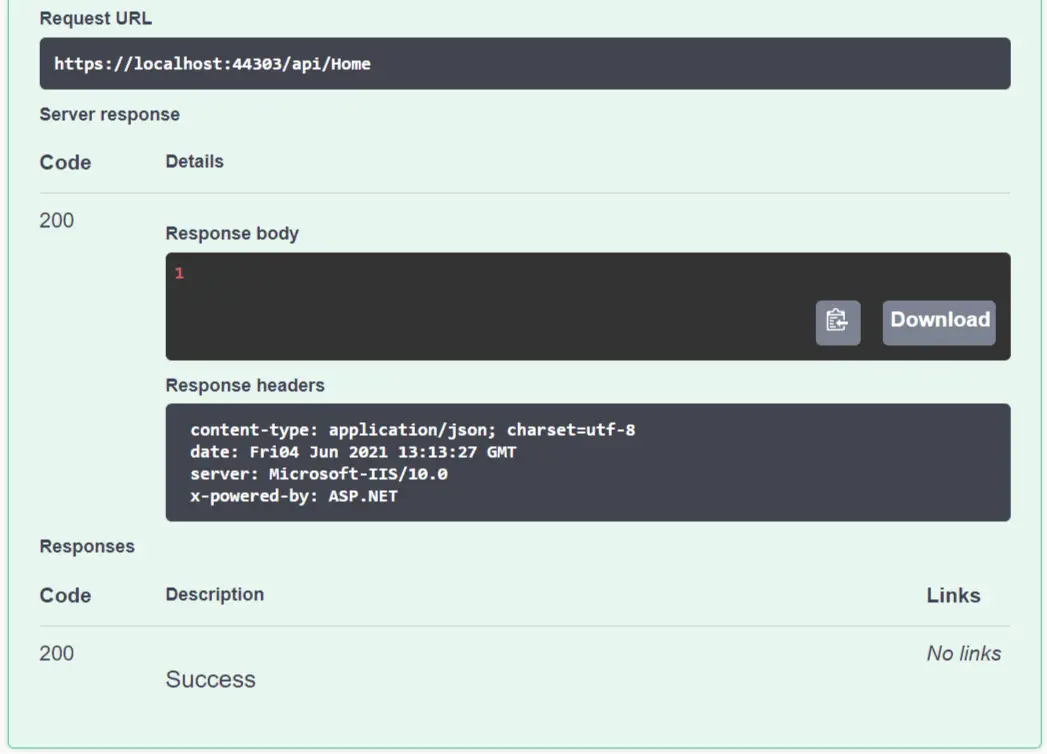
You will see success response with the created student id in the response body. This will be 1 since it is the first record which we created.
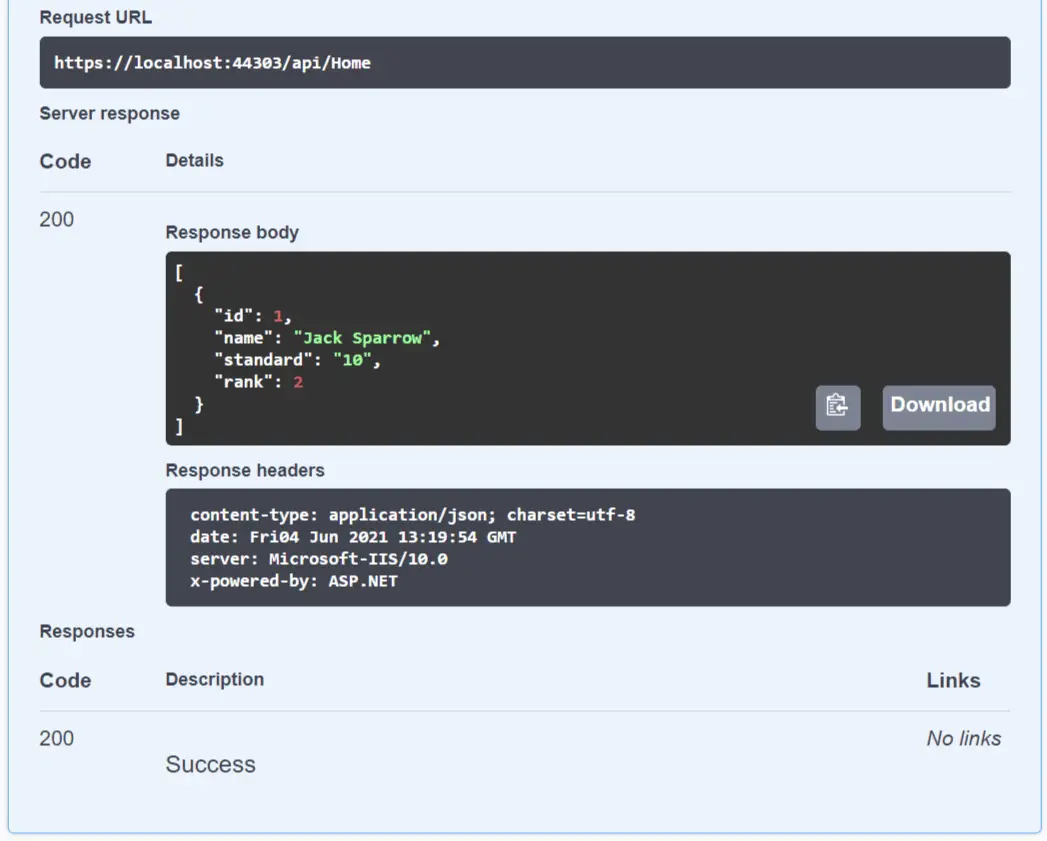
Now click the GET button on Swagger page to test the Read functionality. You will see all the students records in json.
[
  {
    "id": 1,
    "name": "Jack Sparrow",
    "standard": "10",
    "rank": 2
  }
]
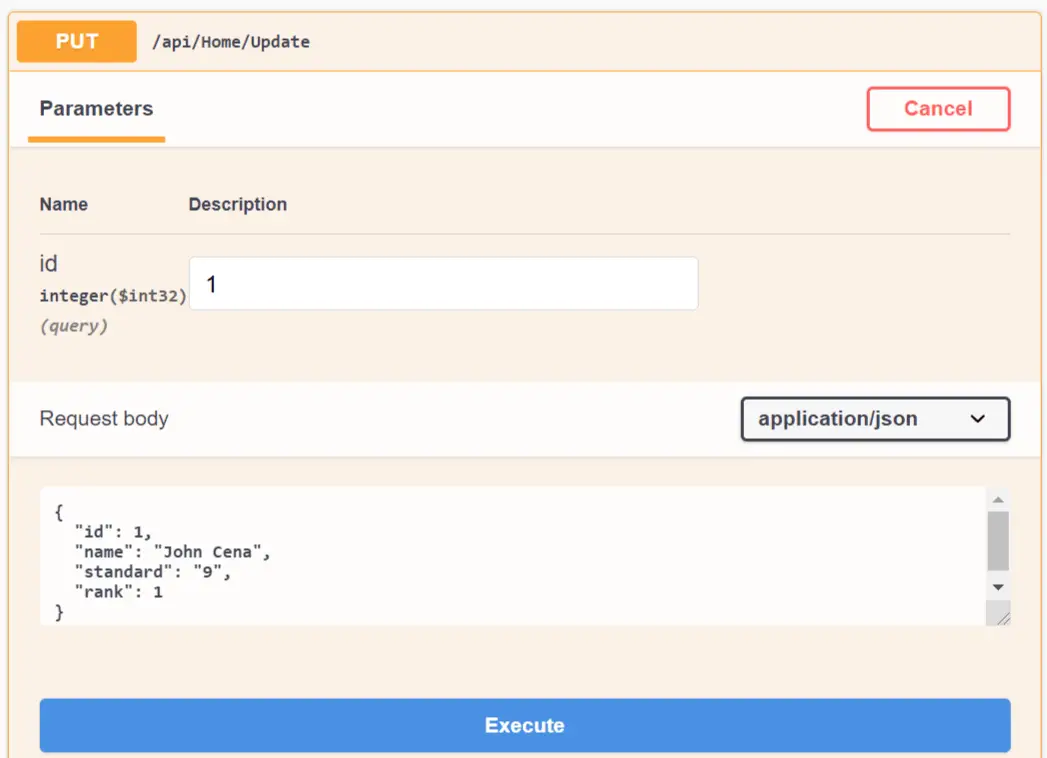
Next click the PUT button on the swagger page. We will now update the first student record. So on the “Id” field enter 1 which is the id of the student, and on the request body change the name, standard and rank values of the student, see below json.
{
  "id": 1,
  "name": "John Cena",
  "standard": "9",
  "rank": 1
}
Click the execute button and the record will be updated. Confirm this by the second GET button on swagger page which shows the url /api/Home/{id}. Enter 1 on the id field and click the execute button.
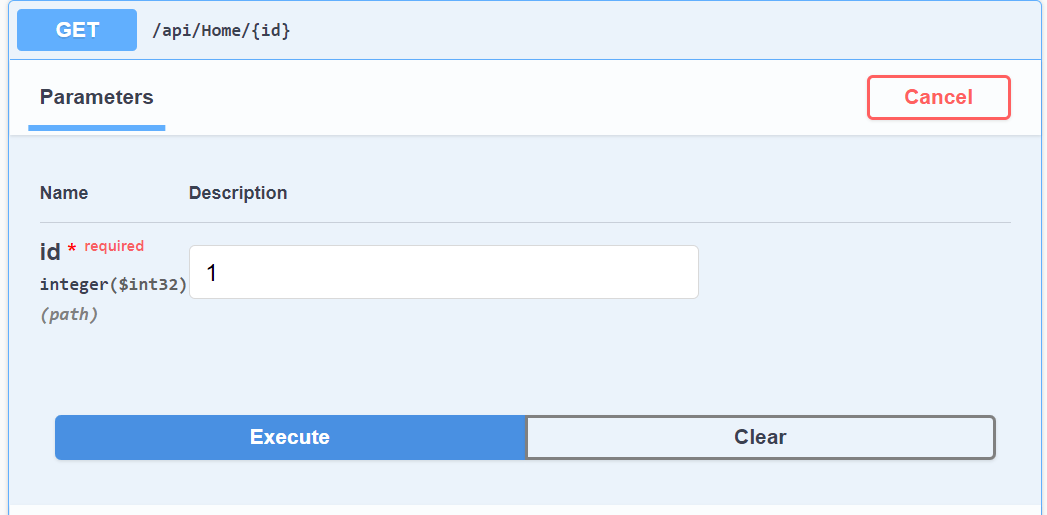
You will see the student’s json is updated with the new values.
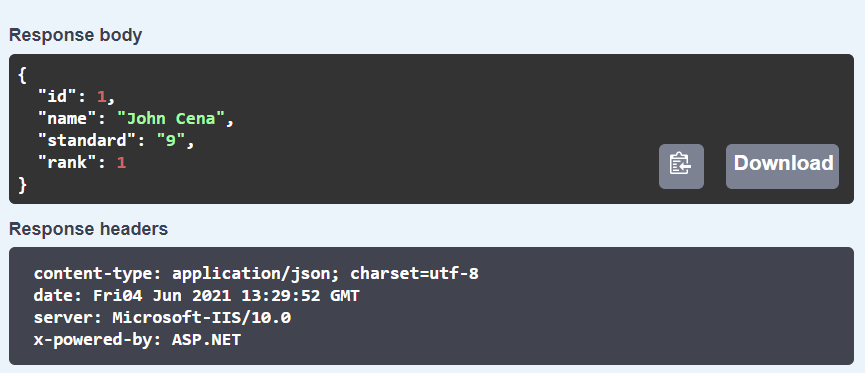
Finally check the DELETE functionality which I leave it to yourself.
I hope this ASP.NET Core Onion Architecture guide is easy for you to understand. I can say that it will make you fully ready to develop enterprise type apps on this architecture. Also make sure you download the codes from my GitHub repository whose link is shared in the beginning of this tutorial. Enjoy and happy coding!
SHARE THIS ARTICLE